Tiffin Tuesday - Fruits of the Forest

Tuesday, July 31, 2007

Posted by jokergirl@wererabbits


Main course: Spanish potato tortilla on a bed of salad. Black garlic olives.
Side dish: Cherry tomato salad with red onion and fresh basil; green garlic olive.
Dessert: Freshly-picked forest berries on yoghurt, all frozen to serve as ice pack (this goes back into the freezer until tomorrow).


I love summer! Not just because it's warm and nice but it's also the season of fruits, herbs and berrypicking. My grandmother used to go to the forest with me to pick berries and I plan to do the same with my children and grandchildren, if I ever have any. It's so important to know where the food comes from when it's not bought in the supermarket. How to live off the land and what delicacies there are hiding in our own forests and meadows is starting to become a sadly forgotten art, and even though I grew up mostly in a city myself it saddens me when I meet people my age who can barely tell a chestnut tree from a cherry tree and would never eat anything straight from the forest. (I say to hell with hygiene, forest berries taste the best when fresh from the branch.)
Today I went to the forest in search of mushrooms. I didn't find any yet, although the weather was perfect - I guess there were too many mushroom pickers before me! - but I did find an abundance of wild raspberries, forest strawberries and blueberries. I'm especially happy about the forest strawberries (or smultron as they are called in Swedish) because they taste so much better than the giant strawberries you can buy in supermarkets. Talk about a taste explosion in every single, tiny berry you pick. I had a hard time picking any for later and not putting every berry in my mouth immediately!


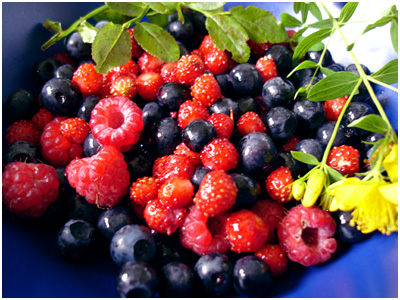
It is no coincidence or photographic accessorizing though that amidst all the berries, there is also a flower. When I went out to the forest with my grandmother, we did not only pick berries and mushrooms!
The yellow flower giving such a pretty contrast to the red and blue berries is called St. John's Wort or in German, Johanniskraut and can be used dried as a tea, or steeped in alcohol as an antibiotic tincture that speeds up wound healing. It is rumoured to be good against mild depressions even!
When I saw it growing wild and abundant in the forests close to here, I remembered how we used to collect it and decided to pick and dry some of my own. Herbal medicine, and knowledge of wild herbs is sadly a vanishing art here in Europe, and I am very interested in keeping the knowledge of living off the land alive, at least as little as I ever learned about it! I'm planning to write more articles on vanishing vegetable sorts and herbs on this blog as I stumble across them. Did you know, for example, that you can eat dandelion leaves as a salad in spring, if you pick them very young and before they grow flowers? (I plan to sneak that into a bento next spring, if I get the chance...)


Are you interested in contributing to The Daily Tiffin? Drop us an email: blogmeeta@gmail.com. We look forward to hearing your ideas.

This Post was written by jokergirl from Were Rabbits

Inside A German Bakery: A nutty walnut bread

Monday, July 30, 2007

Posted by Meeta K. Wolff

walnut bread (01)


Today's speciality at the DT bakery is the Walnut bread. A lovely nutty and moist bread that tastes fantastic with sweet and with savory spreads.

If one would like to get their hands on this particular bread they need to order it in advance. It's that popular.


I can understand why too. It's made with spelt flour, but it’s not too dense and has a generous helping of walnuts for that extra crunch.

My baker is a clever man. He has four to five different types of breads that he keeps totally exclusive. They are only baked in small amounts and just once a week. Each weekday he offers a different type of bread. So, Tuesdays is the day you can get your hands on the walnut bread. When they have all been sold out for the day, he does not bake an extra batch. This way he manages to keep these breads on the top 5 of everyone’s list. People really rush to buy these top of the rank breads. As a matter of fact if you want to get your hands on one of these breads in time (and you forgot to reserve one on the day before), you’ll have to go there early in the morning. It is not uncommon that you’ll have to wait in a pretty long line to get served.

Well you all do not need to wait in any line. I am passing the recipe on to you right here! Hope you enjoy it.

walnut bread (02)


Walnut Spelt Bread

600g fine spelt flour
½ cube yeast
½ teaspoon honey
100 ml warm water
200 ml warm milk
100 g butter – melted
2 teaspoons flour
½ teaspoon of fine dried herbs
200 g walnuts – coarsely chopped
handful flour

Preheat oven at 200C.

Mix the spelt flour with the yeast, honey, water, and 2/3 of the butter in a large bowl until the ingredients have incorporated well. Place in a warm place and allow to rise for approx. 40 minutes.

Knead once again, punching the dough with your hands. In a small bowl place the handful of flour and coat the walnuts with it. Now work the nuts into the dough. Put the dough into a loaf pan and allow to rise until it has doubled in size.

Place the loaf tin into the oven and bake for 40 minutes. Take out and pour the rest of the butter over the top, then bake again for 10 minutes.

Mr. Becker said there are some variations to his recipe here, but this should work really well in conventional everyday home ovens.

My favorite spread on this bread is one I got form my WeightWatchers cookbook. It’s a lovely Carrot Ginger Spread. The aromatic flavors of the ginger rally harmonizes perfectly with the nutty bread.

Carrot Ginger Spread
5 medium carrots – peeled and cut into large pieces
1 shallot – peeled and cut into pieces
2 pieces ginger -about 1 by 1 1/2 inches each - peeled
2 tablespoons low-sodium soy sauce
2 tablespoons water
1 tablespoon rice vinegar
1 tablespoon vegetable oil.

Toss all the ingredients into a food processor and pulse to a paste.

This tastes awesome just plain but I also love it with some tuna salad.

Hope you enjoy bread baking this week ;-)! If not I wish you all a great start to your week!


Are you interested in contributing to The Daily Tiffin? Drop us an email: blogmeeta@gmail.com. We look forward to hearing your ideas.

This Post was written by Meeta from What's For Lunch, Honey?

Keep Your Joints In Shape

Sunday, July 29, 2007

Posted by Helene


We have all felt tight or achy at some point or another and we kept on going about our day not thinking too much about what was going on inside our bodies. We blame it on the weather, a long week, a bad couple nights of sleep. We never think too much of our bodies as a complex set of mechanics. We like to think that we tell it what to do and it will just keep on responding. Well, where your joints are concerned, what you do and do not makes a big difference. Taking care of your joints now can prevent major disabilities such as osteoarthritis, and aches and pains in your spine, hips, hands,…

Let’s do a quick anatomy of your joints:
A hinge joint is similar to the opening and closing of a door. Some examples of hinge joints are the elbow, knee, ankle and joints between the fingers.
Ball and socket joints allow twisting and turning movements. Some of these joints are the shoulder and the hip.
Other joints: Gliding joints allow two flat bones to slide over each other like in the bones of the foot and wrist. A condyloid joint allows the head to nod and the fingers to bend. The thumbs has a saddle joint that allows enough flexibility for the thumb to touch any other finger.
Although serving a different purpose, they all share similar features. In your joints you will find the ligament which acts as a bridge from one bone to the other via the muscle. There is also cartilage that acts as a shock absorber to prevent bones from grinding against each other.

Joint problems occur when we start to lose that cushioning and there are a number of factor contributing cumulatively to this loss.
1/ Aging: cartilage thins as we age and overtime its surface can change from smooth to fissured. That’s when erosions in cartilage start to appear.
2/ Previous injuries: minor joint injuries like a twist or tear when you were younger can be areas of damage years later
3/ Inflammation: small but repetitive injuries can cause low levels of inflammation and damaged or inflammatory cells can gather at a site of injury and release chemicals destructive to cartilage.
4/ Loss of muscle mass: there is no other way to put it but it is a fact that we all lose some muscle mass as we age. We need to work out to maintain it or our joints will absorb more of the pounding from daily living, instead of your muscles, contributing to more damage in the end.
5/ Excess weight: the more a joint has to carry the more damage it experiences in the lonng run. Extra weight can have a wear and tear effect in the cartilage and the cushion can get thinner until there is nothing left.


Obviously you can’t bring back cartilage that is already lost but there are several easy steps you ca take to prevent or reduce the disabilities associated with joint pain.
1/ Maintain a healthy weight: if you carry extra weight, a loss of only 10% your body weight can reduce pain due to arthritis by 50% . Weight loss may also help slow the progression of arthritis over time.
2/ Vary your exercise: do a mix of low or non-impact aerobics like swimming, walking or cycling at least 3 times a week. Add strength training exercises twice a week mixed with stretching, Pilates or/and Yoga.
3/ Use your muscles: weight training helps strengthen the ligaments and muscles around your joints, but you need to modify certain exercises if you are already experiencing pain. Do seated leg lifts instead of squats and lunges for example. Working out with a band is also a good option.
4/ Use ice: icing your joints after exercising can help prevent pain and reduce swelling. Every time we exercise, we draw a lubricant called synovial fluid to our joints, but if it stays there too long after exercise it can cause cracks in the cartilage. Applying ice gets that fluid out of the joints and into the lymphatic system,” the garbage disposal” of the body so to speak.
5/ Eat “joint beneficial” foods: studies show that omega-3 fatty acids found in fish like tuna and salmon can help reduce the symptoms associated with joint pain and also reduce some of the levels of inflammation that may be causing some of the pain.
Vitamin D may also protect your joints via an anti-inflammatory effect. Research suggest getting between 400 to 800 International Units (IUs) might be beneficial. One cup of milk contains 100 IUs, and three ounces of salmon has roughly 400-500 IUs for example.


Are you interested in contributing to The Daily Tiffin? Drop us an email: blogmeeta@gmail.com. We look forward to hearing your ideas.

This Post was written by Helen from Tartelette


Healthy Eating – getting started

Thursday, July 26, 2007

Posted by Abby


If you’ve decided to try and eat a bit more healthily, by boosting your fruit and vegetable intake, it’s worth thinking about how to get things kick-started.

Think about which fruit and vegetables you and your family like then stock up on these. Also, think about the meals you cook that have a good fruit and vegetable content and schedule these into a meal planner for the week - just list what you will eat on each day and check if you’re likely to get up to 5 portions.


Getting more fruit and vegetables into your house and using them as the basis for your meals is really important.

Planning your meals in advance and using this as the basis for your shopping list is one approach. To be honest I’m not good at this as I choose what to cook depending on my mood. This means that stocking up on things I know I like is a good approach for me.

Thinking about how you shop for fruit and vegetables can also make a real difference. I like going to my local market and choosing which fruit and vegetables to buy based on what is in season and looks particularly good – colour, smell etc.

There are a few regular purchases I make to ensure we have a good mix of things - carrots for snacking on in the day, fresh tomatoes for salads or easy pasta dishes, plus onions, garlic, chillies, herbs and lemons to add flavour to dishes. With fruit I always stock up on bananas and apples/pears which act as the base ingredients for our daily smoothie.

If you live somewhere more rural a trip to your local farm shop or farmers market might be a good approach.

Increasingly popular are fruit and vegetable boxes. These are boxes of fruit and/or vegetables which you are delivered to your home (or office if you prefer). They usually contain fresh produce that is locally sourced and is often organic. This reduces the environmental impact your shopping is having as well as supports local business and provides you with fresh and tasty food.

The fun bit is that, because the boxes are seasonal, you never really know what you’re going to get. This is a great way to make yourself be a more creative cook and try new things. Kohlrabi is something that a lot of vegetable boxes contain at the moment and usually prompts a look of fear and confusion – thankfully most fruit and vegetable box suppliers include a wide selection of recipes on their websites!

If cost is a driver for you then both market shopping and fruit and vegetable boxes can be comparable with supermarket shopping. In fact markets, assuming you’re not exclusively using gourmet markets that stock every product imaginable but at costs to match, can be real money savers. This is particularly true if you go towards the end of the day. But, beware if you’re a bargain hunter – you may need to pick up a book about how to make jam or chutney to help you dispose of that box of apples or giant bag of peppers!


Are you interested in contributing to The Daily Tiffin? Drop us an email: blogmeeta@gmail.com. We look forward to hearing your ideas.

This Post was written by Abby from eat the right stuff.


Say Cheese!

Wednesday, July 25, 2007

Posted by YumSugar


I don't know about you guys, but I'm a fiend for cheese. Whether it's a nutty hard cheese, or a soft runny one, there's a place in my heart. At any given time there are at least three cheeses in my fridge, but if I could have my way there would be at least seven (one for every day of the week). Everyone has their own personal favorites (mine are aged goudas like Amsterdam Reserve or creamy goats like Humboldt Fog), but no matter what cheese you take home you should learn how to properly store and care for it (not that it's going to last long anyway...). Here are some of my tips to help ensure your lovely cheese will last:


  • Remove cheese from fridge an hour before serving, so that it can be up to room temperature (that's when it tastes best). Only remove what you're planning on eating.


  • If you're going to eat it in a day or two, the cheese can be left out at room temperature.


  • If mold develops on hard or semi-soft cheeses (such as cheddar and swiss), it's okay to cut it off. To be safe, cut a half inch of cheese off on all sides with visible mold. If it shows up on soft cheeses (such as brie), then say good bye and toss it out.


  • Speaking of mold, keep blue cheeses away from other foods and definitely in separate containers. The spores in the blue cheese can migrate to other foods.


  • Don't freeze your cheese. A lot of people say you can, but if you do, use the cheese for cooking only. The flavor and texture are definitely diminished after freezing.


  • Cheese should be refrigerated in the original wrapping until ready to use. Keep it in an area where it will be less likely to pick up the other odors/flavors floating around in the fridge.


  • Once unwrapped, wrap hard or semi-soft cheese in wax paper (it's better than plastic) and if possible store in a sealed plastic container. Use a fresh piece of wax paper each time. Soft-cheeses do not need the wax paper and should be kept in a sealed container.


  • Consider double wrapping potent (aka stinky) cheeses so that their odors do not escape.


  • My favorite tip: enjoy and explore! Get adventurous and try new cheeses. And once you've found one you like, share it with your friends!


Are you interested in contributing to The Daily Tiffin? Drop us an email: blogmeeta@gmail.com. We look forward to hearing your ideas.

This Post was written by sabrina from YumSugar


Tropical Flavors & Accidents

Tuesday, July 24, 2007

Posted by Meeta K. Wolff


We've been having pretty hot weather the past few days. Tropical almost! Just the palm trees and blue lagoon are missing.

This kind of weather normally takes people in herds to our local public pool. To be honest I do not find anything relaxing about rushing to an over filled pool club, screaming kids and irritated grown-ups. We normally go to the pool when we know there is a little less "traffic". This way Soeren can enjoy the playground and use the pools and pool slides at his leisure without being pushed and shoved.

On that particular day two of my friends asked us if we wanted to join them. I said no. Because I knew the pool would be over crowded. Besides that we had already planned a bike tour with Soeren's buddy Jeremy and his mum. We wanted to go down to the soccer field, let the boys kick around a bit and then have a little picnic. After that ride down to the river and simply relax under a shady tree. No crowds and quite idyllic. It did not work that way.

On the way to the river Soeren had a bike accident. He went flying over the handle bars of his bicycle! I saw my kid flying over the bars in slow motion and landing face first on the rubble path!
I am telling you - thank God he had his bike helmet on, otherwise ... well I do not even want to think about the otherwise. By the time I got to him he had stood up and all I saw was blood pouring out from below his helmet. My heart did a turn!

My friend quickly laid out a blanket and I got the first aid kit out. Checked if his neck and head was OK to move and slowly removed the helmet. A cut on his forehead, nose and chin and gashes on his elbows and a few bruises on his chest. It looked worse than it really was. We stopped the bleeding, rested a bit and he was fine. He even wanted to get back on the bike and ride on to the river. We took him to the clinic to get the huge bruise on his head checked up, but all was OK.

What I learned here was the fact that I managed to stay so cool and keep a clear head. I always thought I would freak at the sight of my son in any kind of accident, but both, my friend Dani and I kept pretty cool and simply did the right things (as we were informed by the Doc later that evening). I also learned that even kids at this age are exceptionally helpful. Jeremy, who is the same age as Soeren, went and collected all our bikes, which were lying in the middle of the path, while we were tending to Soeren. He also got a bottle of water out for his buddy and told him to drink. Cute!

However, the most important lesson here is make sure the kids are wearing their protective gear when they are out on bikes, skateboards, roller blades etc. Soeren never goes on the bike without his helmet. This is a rule we stick to religiously - no bending. Thankfully Soeren never argues about it either. That day, after I took a look at the helmet, I knew if he had not been wearing it he would not have gotten away with a few cuts and bruises.

His remark that evening: "I finally get a new helmet!"
"Funny way of going about it!" was my comment.


Contents of the tropical flavored lunch box: Egg salad with Italian mortadella on Finnish rye flat bread, baby bell pepper. For the fruit there are chunks of juicy pineapple, organic plums and grapes. The cake is a specialty from Soeren's great grandma - a coconut crumble cake.

Prep time: 10 minutes
The egg salad is a super fast version that I made quickly that morning. I simply layered it on both sides of the Finnish bread, after toasting it in the toaster. In between I added some Italian mortadella (vegetarians should try sautéed mushrooms with onions). While the eggs were boiling I cut up the fruit and a slice of the cake. The mini bell peppers are perfect for lunch boxes as they fit in so well and they taste sweet and juicy.

Quick Egg Salad Recipe

2-3 hard boiled eggs - chopped
1-2 tablespoons cream cheese
1-2 tablespoons sour cream
salt and pepper
1-2 pineapple slices - finely chopped

Mix the cheese, sour cream, salt and pepper in a bowl until smooth. Fold in the chopped eggs and pineapple.

Variations: Instead of the pineapple add peas, carrots or bell peppers for different flavors.

A perfect tropical flavored dessert as a special treat would be the Tropicana Ceam. This can also be placed in a small container with a lid for the lunch box. Make sure you place a cool pack between the containers to keep the cream cool.

I hope you all have a safe and healthy week with your families.

Take care!


Technorati Tags: , , , , , , , ,


Are you interested in contributing to The Daily Tiffin? Drop us an email: blogmeeta@gmail.com. We look forward to hearing your ideas.

This Post was written by Meeta from What's For Lunch, Honey?

Weekly Reflections: Motivation Check-Up

Saturday, July 21, 2007

Posted by Helene


So it’s been a few weeks since you started your workout routine and you are wondering if you are still on the right track or why the pounds and inches are not disappearing faster. Maybe you have just started incorporating some fitness essentials to your life and wonder if you are doing it right. Maybe you’ve just hit that workout/healthy eating block and need some positive reinforcements. Here are 8 ideas that came about during conversations with my clients during the week.

1/ Stop living in the past: throw away that pair of jeans you have kept since high school in the hope to fit into them again, or that picture of you and your mate on vacation on a sunny beach 5 years ago. I am not saying that you will never be able to look that way again, but in a way I am. Your body and metabolism are different than it was when you were 18. Your nutritional and exercise needs are different now that you are an adult or a mother/father. We always idealize those days way back when we used to fit in those jeans, but if we had a time machine and transport ourselves to those times we would see that we were not happier then than we are now, aiming then for the next 5 pounds or the next tight pair of jeans. Make new memories today, with the new and improved you. Health is not about looks, it’s how fit you are inside your own body….and your old jeans don’t care!

2/ Prepare yourself for a fit day: make it a daily appointment We would not dream to cancel with Jackson “the” hairdresser en vogue to make ourselves look good, or the dentist to get a perfect smile. Do not cancel on yourself. Your body and your health are not gifts but a responsibility.

3/ Start slow: I love working with new clients who are super motivated about their new commitment. I am also a bit worried because I know that if I do not slow them down a little, I’ll ever see them 2 months from now. They will have exhausted their enthusiasm and energy level. It takes energy to build up energy. It also takes daily commitments to doing something physical. Build your stamina and resistance slowly. I am at it everyday so it is part of my routine, my job but I did not start running a 5k before I knew how to manage my endurance level. Discuss with your trainer ways that you can start off with a program that is challenging for you at the time and hot to build up from there.

4/ Get the family involved. During a school week, I realize it’s not always easy to find the time for extra activities, but the weekends are the perfect opportunities to schedule a picnic in the park, a game of hide and seek, a bike ride on a favorite trail, etc… If the kids see you active and healthy they will integrate these images in their minds and remember them when they are adults themselves. Call mom or sister for a walk, window shopping at the mall or antiquing. Health is also about establishing mind and body connections. Working out is great, but “feeling” good also does a body good.


5/ Surround yourself with positive influences: People who are motivated, inspired and determined are people who live a better quality of life and people I try to surround myself with. However, I am sure that you have heard your pushy co-worker, best friend or mate say at some point: “oh, c’mon, 3 fries are not going to break your diet”, “you can skip the gym today, we never do anything together anymore?”
They are just trying to make you fell bad because you are doing something good for you and they are not, and they probably should. I wish I knew the reasons why people say or do things like that, but it is human. Tell them, you have one life and might as well be fit to live it well and not popping pills like they are candies while not being able to move and visit them.

6/ Put the pain or/and lack of motivation in perspective: when things get tough, remember the trillion loads of laundry you do each months, the countless hours spend carpooling for their sports activities. Once you start walking on the treadmill or lifting those dumbbells, you forget how tough and long the road can be and think about the rewards once you reach your destination.

7/ Just “Do It”: go tot the park, take a walk. Nobody makes a paycheck without working, nobody makes a cake without baking….nobody gets healthy without doing the work. 98% of life is showing up.

8/ Understand your energy cycles: this is especially true for women. Follow your menstrual cycle closely. Although it is true that you will experience less cramps as you get fitter, you will be more tried around that time of the month, so it is ok to take it down one notch. Women are different and some will experience a rush of energy prior to that time, so it is ok to kick it up a bit. Remember to listen to your body’s clues. Do not exercise if you are sick or extremely tired as you will be more prone to not pay attention to your form and injure yourself in the long run. Men are also susceptible to fatigue injuries and sore muscles. Guys, it is ok to skip a workout…you won’t lose that 6 pack in a week!


Are you interested in contributing to The Daily Tiffin? Drop us an email: blogmeeta@gmail.com. We look forward to hearing your ideas.

This Post was written by Helen from Tartelette


Superfoods: The Allium Family

Thursday, July 19, 2007

Posted by Meeta K. Wolff


Onions, Garlic, Chives, Leeks, Shallots and Scallions

If açaí is the most exotic food on this list, the Allium family of foods is perhaps the most humble. The Chinese refer to the Alliums-garlic, onions, leeks, shallots, scallions, and chives-as “jewels among vegetables”, and prize them for their health-giving properties and for their sharp taste and smell.

Garlic, onions, leeks and chives contain flavonoids that stimulate the production of glutathione (the tripeptide that is the liver's most potent antioxidant). Glutathione enhances elimination of toxins and carcinogens, putting the Allium family of vegetables at the top of the list for foods that can help prevent cancer.
Here are just a few benefits from members of this family.


Garlic

  • Lowers total cholesterol (but raises HDL—"good"—cholesterol)
  • Lessens the risk of atherosclerosis (hardening of the arteries)
  • Lowers blood pressure
  • Reduces the risk of blood clots (cause of the majority of strokes and heart attacks)
  • Destroys infection-causing viruses and bacteria
  • Reduces the risk of certain cancers, in particular, stomach cancers
  • Produces more "natural killer" cells in the blood to fight tumors and infections
  • Helps fight against neurological diseases such as Alzheimer's
  • Enhances detoxification by reducing toxins

For optimum effect, eat garlic raw. Cooking can destroy some of the allicin compound, which is the active constituent. Dehydrated garlic flakes, garlic powder, garlic extract, garlic juice are all convenient products, they're a poor flavor substitute for the less expensive, readily available and easy-to-store fresh garlic. So always go for fresh garlic.

Onions


  • Inhibit the growth of cancerous cells
  • Increase in HDL cholesterol (especially when eaten raw)
  • Reduce total cholesterol levels
  • Increase blood-clot dissolving activity
    Help prevent colds
  • Stimulate the immune system
  • Reduce the risks of diabetes
    Have antibacterial and antifungal properties
  • Reduce the risk of certain cancers
  • Help relieve stomach upset and other gastrointestinal disorders


Onions contain two powerful antioxidants, sulphur and quercetin—both help neutralize the free radicals in the body, and protect the membranes of the body's cells from damage.

Leeks


Leeks have all of the healthy properties of the Allium family as described above. However leeks also contain these nutrients:
  • Vitamin B6
  • Vitamin C
  • Folate
  • Manganese
  • Iron
  • Fiber


This particular combination of nutrients makes leeks particularly helpful in stabilizing blood sugar, since they not only slow the absorption of sugars from the intestinal tract, but help ensure that they are properly metabolized in the body. Remember, the stabilization of blood sugar is one of the most important goals of the Perricone Promise. Spikes in blood sugar accelerate aging, wrinkles and a host of degenerative diseases.

We all know that onions and garlic are important for imparting delicious flavor to a meal. However, when we include leeks, we raise the flavor of the meal from delicious to "sublime."

(Source: Dr. Perricone’s 10 superfoods)


Are you interested in contributing to The Daily Tiffin? Drop us an email: blogmeeta@gmail.com. We look forward to hearing your ideas.

This Post was contributed by Pintoo from Zaayka

Leftover Remake: Curry pasta lunches

Tuesday, July 17, 2007

Posted by Biggie

I had some leftover chicken curry from dinner and some frozen unsauced pasta, so today's lunches are a Leftover Remake: curry pasta.

070713c


Contents of my lunch: Japanese curry pasta (gemelli) with chicken, carrots, onions, potatoes and added broccoli. The fruit layer has fresh figs, half an apricot, blackberries and mango nectarine. The mango nectarine is a pale nectarine reminiscent of both mango and nectarine in flavor and texture -- delicious although delicate and easily bruised. I packed mango nectarines in last summer and liked the flavor, so when I saw them again this year I picked some up. Good thing, as evidently their season is very short (just two to three weeks in the summer).

070713a

Morning prep time: 6 minutes, using frozen unsauced pasta and leftover curry. I quickly cooked some broccoli florets in my microwave mini steamer for one minute, and added them to the leftover curry and frozen pasta that I microwaved to revive the texture before packing. Sliced some fruit and we're ready to go.


Packing: Much of the fruit here is very delicate and ill-suited to rough treatment or tight packing (see gap fillers). As blackberries are especially fragile, I put them in a reusable plastic food cup to ensure they didn't turn into mush in transit. I like these little cups as they're reusable like silicone cupcake liners, but sturdy enough to actually protect the food inside from damage. I bought some of these at Daiso, others from eBay (click the photo for details). I did forget to reserve some extra curry sauce to pack on the side, though, so unfortunately the pasta was a big dry by the time we ate it (live and learn). The lunch was packed in my 580ml Urara dragonfly box.

Reusable plastic food cups

070713d

I packed my husband's meal in stainless steel containers (review here) for a masculine touch.

070713b

My two-year-old's meal was lightly packed into a 600ml two-tier box with built-in food cup. The meal would have been too big for him according to the bento box size guidelines, but he decided he didn't like this shape of pasta (go figure!) and just ate the meat and veggies out of the curry pasta. The curry was a big hit with him at dinner (Curry no Ohji-sama from S&B -- a Japanese curry roux for kids), just not this particular pasta. Oh well!


Are you interested in contributing to The Daily Tiffin? Drop us an email: blogmeeta@gmail.com. We look forward to hearing your ideas.

This Post was written by Biggie from Lunch in a Box: Building a Better Bento.

Inside a German Bakery: Onion Ring

Monday, July 16, 2007

Posted by Meeta K. Wolff

Onion Ring (03) by Meeta Ablrecht
After a lovely vacation in Prerow we are back full of energy and completely relaxed.

I am also looking forward to continuing the German bread series, started a few weeks ago. Today I am featuring a wonderful and exceptionally flavorful bread. The onion ring.

When you buy the bread from the baker it comes in a ring and looks like the letter "O". As you can see from the pictures I could not take a picture of the whole ring because as soon as I come home with it, the aroma of this bread brings both my boys to the kitchen. Then the bread is sliced and spread with butter and enjoyed with this simple pleasure.

The onion ring is made of wholewheat flour and a mixture of slowly roasted onions and herbs. It took me a while to coax the recipe for this one from my baker - he did not reveal everything - but I hope the recipe I provide below is one that comes very close to it.

We often buy this bread when we are craving for something wonderfully savory or have a BBQ party coming up. It's always a huge hit with our guests and a brilliant alternative to the ordinary baguette.

It normally does not happen, but if we do have any leftovers of this bread, I love making bruschetta with it. After a day or so, I find this bread tastes more intensively of the onions and therefore works incredibly well when combined with roasted vegetables and toasted. My favorite kind of Bruchetta is a delicious recipe from Jamie's Italy by Jamie Oliver - Aubergine and Mint Bruschetta.

Hope you enjoy both the recipes.

Onion Ring (02) by Meeta Ablrecht

Onion Ring

Ingredients
800g + more Wholewheat flour
50g yeast
3/8 l luke warm water
2 teaspoons salt
4 onions - finely chopped
handful herbs - finely chopped
1 tablespoon butter

Method
Preheat oven to 220 degrees C.

In a pan heat the butter and gently sauté the onions until browned and caramelized. Sprinkle the herbs and allow to cool.

In a large mixing bowl add the flour and make a well in the middle of it. Mix the yeast in 1/8 l of luke warm water and then pour into the well. Sprinkle with a bit of flour. Covered with a damp tea towel place the bowl in a warm place for 15 minutes.

Add the salt in the remaining water and then pour this into the dough. Add the onion-herb mixture. Knead to incorporate the ingredients. Once you have a smooth dough, form the dough into a ball and scatter some flour. Put the ball of dough back into the bowl and allow to rise covered with a damp tea towel in a warm place - about 30-40 minutes. The dough should have doubled in size.

Place the dough on your kitchen counter and start kneading. Knead for a few minutes, then form either a ring, by rolling the dough into a"snake-like" form and then joining the ends together to form an "O", or simply form a longish loaf out of it.

On a greased baking tray place the onion loaf and allow to rise for another 15 minutes. Then brush the top of the loaf with some water, sprinkle some flour and bake for a good 40 minutes.

Enjoy warm.

If you have any leftover the next day, make these lovely snacks for dinner.

Onion Ring (01) by Meeta Ablrecht

Aubergine and Mint Bruschetta
Adapted from Jamie's Italy by Jamie Oliver

Ingredients
2 aubergines - sliced in approx. 3 cm thick slices
Good olive oil
White wine vinegar
Large handful of Italian parsley - cut into strips
Small handful of mint - cut into strips
2 garlic cloves - 1 finely sliced and one halved
Salt and freshly cracked black pepper

Method
Heat a grill pan and place the aubergine slices next to each other. When they have nicely grilled on both sides and are a golden color remove them from the pan and place them in a bowl.

In the meantime in another bowl mix together a 3 tablespoons of vinegar and 8 tablespoons of olive oil with the parsley, mint and the garlic. Salt and pepper to taste.

Pour the vinaigrette over the grilled aubergine slices and allow to marinate for a few minutes.

Cut slices of your onion bread and grill these in your grill pan. Rub the halved garlic clove onto the toasted slice of bread. Sprinkle with a dash of olive oil.

To assemble your bruschetta place the aubergine mixture of the toasted bread and press down so that the aromas of the mixture get soaked into the bread.

Enjoy with a glass of wine.

Hope you have a great week ahead!


Are you interested in contributing to The Daily Tiffin? Drop us an email: blogmeeta@gmail.com. We look forward to hearing your ideas.

Technorati Tags: , , , , , , ,


This Post was written by Meeta from What's For Lunch, Honey?

A Workout With Bands

Friday, July 13, 2007

Posted by Helene

As a trainer and class instructor I have complete free access to the gym which I consider a blessing since I love my job! Some of my clients outside of the club are stay at home moms, seniors, or people on physical rehabilitation. Obviously, I can’t carry a whole set of dumbbells, benches and bars everywhere I go, and when I train one on one I rarely use gym machines but think outside the box. A few days ago, I brought an exercise band to a dear friend of mine and showed her some exercise to get her started on a fitness routine. I told her to supplement with dumbbells in a few weeks. Bands take no room, require your own body resistance and can be used short and tight or long and loose depending your strength.


Biceps Curls with Band


Starting Position:
Stand on center of band with feet close together, knees slightly bent. Grip handles in front of thighs, palms facing outward. Hug elbows in tight to your torso and contract abs.
Action:
Without leaning back, and keeping upper arms stationary, curl hands up to your shoulders. (exhale)
Slowly lower to starting position to complete one rep. (inhale)
Make it harder: Step your feet out to the sides, closer to the ends of the band and/or grip closer towards the center as opposed to the very end (handles) of the band.
Make it easier: Step as close as possible to the center and grip the end of the band.

Low Mount Seated Rows with Band


Starting Position:
Sit on floor or bench with knees slightly bent, feet hip-width apart. Keep back straight, abs in, heels on the floor. Loop band around the soles of the feet, then cross the ends/handles over shins so right hand holds left handle and left hand holds right handle, palms facing down.
Action:
Pull hands toward chest so elbows and fists are at or near shoulder level, pinching shoulder blades together at the end of the movement. (exhale)
Slowly return to starting position to complete one rep. (inhale)
Make it harder: Spread feet apart so they lie on the band closer to handles for more resistance.
Make it easier: Do not cross handles and keep feet close together at center of band. Make sure the band is secure around your feet.
Muscles Worked: Upper back, Triceps

Low Mount Adduction with Band


Starting Position:
Make a loop at one end of the band and place your left ankle into it. Wrap the other end/handle around a low mount, like a furniture leg. Stand to the side a few feet away from the furniture, parallel to it. Hold onto a chair or wall for balance if necessary. Shift weight into right foot keeping knee soft and left foot flexed. Allow the resistance to pull your left leg out to the left side of your body to start.
Action:
Keeping foot flexed, leading with your inner thigh, sweep your left leg across your body towards the right as far as you can. Hold for 1-3 counts. (exhale)
Slowly return to starting position to complete one rep. (inhale)
Finish set before switching sides.
Make it harder: Stand farther away from the mounted end.
Make it easier: Stand closer to the mounted end.
Muscles Worked: Inner thigh, Quads

Low Mount Abduction with Band


Starting Position:
Make a loop at one end of the band and place your right ankle into it. Wrap the other end/handle around a low mount, like a furniture leg. Stand to the side a few feet away from the furniture, parallel to it. Hold onto a chair or wall for balance if necessary. Shift weight into left foot keeping knee soft and right foot flexed. Allow the resistance to pull your right leg across the center line of your body to start.
Action:
Extend your right leg straight out to the side, leading with your outer thigh towards the ceiling, keeping foot flexed. (exhale)
Slowly lower with control to starting position to complete one rep. (inhale)
Finish all reps on this side before switching.
Avoid leaning back or to the sides during the movement. Lower with control- don't let the band's resistance snap your leg back down to the starting position.
Make it harder: Stand farther from the mounted end of the band.
Make it easier: Stand closer to the mounted end of the band.
Muscles Worked: Outer thigh, Hips, Glutes

Seated Knee Lifts with Chair


Starting Position:
Sit on edge of chair, knees bent, feet flat. Grasp sides of chair, lean back slightly.
Action:
Pull knees toward chest as you crunch upper body forward using abs, not arms. (exhale)
Lower feet almost to floor, but don't let them touch until the end of the set. (inhale)
Special Instructions
This movement should be slow and controlled. Don't let the momentum of your legs do the work for you, and don't let gravity snap your legs down as you return to the starting position.
Muscles Worked: Abs

For each exercise, aim for 2-3 sets of 12-15 repetitions.

Note: Big "thank you" to Louise: you can spot her in the background taking pictures while taking care of her great grandson. If you look closely, you might spot Cash in his swing and he was not having a good time! Some pictures are rushed but you get the idea and description of form and execution. My regulat photographer, Ingrid , will be back next week. Thank you ladies! I could not do it without you!


Are you interested in contributing to The Daily Tiffin? Drop us an email: blogmeeta@gmail.com. We look forward to hearing your ideas.

This Post was written by Helen from Tartelette


Healthy Eating – the obvious first step

Thursday, July 12, 2007

Posted by Abby


The easiest way for most people to improve their diet is to increase the amount of fruit and vegetables that they eat. Here in the UK, people are told to aim for 5 portions a day but in some countries the target is as high as 17.

Some people find this thought quite intimidating but, if you bear in mind a few tips and tricks you’ll find it easier than you thought.


There are three things to remember though:
- Potatoes don’t count
- Lentils & beans only count once, no matter how many portions you have
- Fruit juice only counts once, no matter how much you drink

1. To get off to a good start add a handful of berries or some chopped fruit to your breakfast cereal or porridge. Making your own muesli with lots of dried fruit in the mix is also a good strategy, which has the added bonus of being able to provide you with valuable essential fats, vitamins and minerals from nuts and seeds.

2. If you’re not a fan of fresh fruit, how about trying dried fruit as a snack during the day - a handful of raisins counts as one portion.

3. Hummus is a good savoury snack especially if you dip something like carrot or peppers into it rather than crisps or bread. If you make your own, adding tahini (sesame seed paste which you can easily get from a health food shop) and watching the oil content, again you increase the nutritional value.

4. If you eat sandwiches for lunch, make sure they have salad in them. Alternatively, why not have a bean salad for lunch? Or a rice salad to which you’ve added chopped vegetables?

5. Thinking about main meals, always serve some vegetables or a salad. Perhaps make chips using parsnips or sweet potatoes for a change.

6. If you’re cooking for someone who’s not keen on vegetables, things like chilli and bolognaise are good as you can add finely chopped, onions, mushrooms, courgettes etc and their individual tastes won’t stand out.

7. Obviously, eating meals where vegetables are the focus, such as salads or a vegetable stirfry will help as will fruit salad for pudding.

8. Finally, and this is what makes life easy for me, try making a smoothie. Blitz together one banana, one apple, a handful of berries and some fruit juice and you get at least 3 portions in a delicious drink. You can also freeze this mix to make fruit ice-lollies.


Are you interested in contributing to The Daily Tiffin? Drop us an email: blogmeeta@gmail.com. We look forward to hearing your ideas.

This Post was written by Abby from eat the right stuff


Get Rid of That Stinky Disposal

Wednesday, July 11, 2007

Posted by YumSugar


This past weekend our garbage disposal decided to hit me in the face with the most disgusting smell ever. We'd just finished up our 4th of July bbq and I think the mix of watermelon, bbq sauce, raw chicken, roasted peppers and cheese just didn't really mix well. However, I was in luck, we also had a bunch of lemons leftover, so I tossed one in the sink and ran the disposal. Voila! No more nasty sink smell! I also threw in some ice - to help sharpen the blades - while I was at it. If you've got some issues with your disposal, here are some more helpful tips:


  • Occasionally toss a few pieces of ice into the disposal. The grinding of the ice will help to keep the blades sharp.


  • You can also freeze vinegar in ice cube trays and run those down the disposal. You'll keep your blades sharp and get rid of any lingering odors.


  • For stubborn odors pour baking soda into the drain and let it set for several hours before running the water/disposal.


  • Don't put too many peels (especially potatoes) down the disposal. The starches in the potatoes will turn into a thick paste and may cause the blades to stick.


  • It's fairly obvious, but don't run glass, plastic, metal and other non-food items down the disposal.


  • The remains from crab, oysters, etc. should also not be put down the disposal.


  • Avoid grinding fibrous food like onion skins, celery and corn husks.


  • Small amounts of eggshells or small bones are actually good for the disposal and can help scour the sides of the grinder.


  • Be sure to run cold water before, during and after using the disposal. This will help run debris through the pipes. The cold water will help solidify any grease in the pipes.


  • Avoid harsh chemicals like bleach or drain cleaners. If there is a clog, check and clean out the disposal unit first.


Are you interested in contributing to The Daily Tiffin? Drop us an email: blogmeeta@gmail.com. We look forward to hearing your ideas.

This Post was written by Sabrina from YumSugar


Tiffin Tuesday - It's all about colours!

Tuesday, July 10, 2007

Posted by jokergirl@wererabbits

Daily Tiffin News

We'd like to introduce you to our newest addition to the DT team - Abby of Eat The Right Stuff. She knows good healthy food and if you visit her blog you will know that eating good food can be so scrumptious and healthy - go figure! Abby will be sharing secrets on how to make good healthy homemade meals your family (yes and the kids) will love. She will also share the latest food trends in and around the UK.

Here is a little about Abby in her own words:

"I lived in Malawi until I was 14 and grew up eating homemade food made with seasonal ingredients. Moving to the UK and encountering processed food for the first time as a teenager was a real shock. I feel very fortunate to have always eaten homemade food and have the confidence to cook. I am always keen to share how easy it can be to cook and eat healthily. As well as being a keen cook I'm also studying nutritional medicine. My blog is eat the right stuff and I live in London, UK."

Look forward to Abby's first article on Thursday, in the meantime let's all welcome Abby to the Daily Tiffin.


Today's Tiffin is not just about the yummy food - the eyes also eat!


Top: Potato latkes on salad, bear container with ketchup (latkes are pretty much the only thinkg I WILL order ketchup with), tsatsiki and a cherry tomato/basil deco.
Bottom: More fritters on peas, salad and frozen strawberries.

Latkes or as I know them, "Kartoffelpuffer" are one of those "poor man's steak" foods you find all over the world. I have known them since my childhood and frankly know of noone who doesn't like them. This is my mother's family recipe for them, which is really easy:
Peel raw potatoes, grate them and press out the liquid. Mix with egg, flour, chopped onion, parsley salt and pepper to taste. Heat neutral oil (enough to cover the bottom of the pan thinly, it's sadly not too healthy) and drip spoonfuls of the mixture into the pan, flatten them out really thinly with a ladle and flip them once you can see the edges become slightly brown from the top.
I prefer ketchup with them but they also go well with tsatsiki, applesauce or cranberry preserve, and some places in Germany even serve them with sugar and cinnamon.

I try to follow the rule of colours in every bento I make: Red (tomato and strawberries), yellow (the bear and also the latkes), green (peas and salad), light (tsatsiki) and dark (the latkes again). This is not something that I do because I feel bentos should be done according to strict rules - I was doing this long before I ever read that such a rule existed! I like contrasts and use them - you will find that even in bentos that strive to be monochrome, the creator uses contrasts artfully to make the bento visually appealing.
These techniques do not only ensure a pretty to look at bento, but also force me to balance the lunch with healthy fresh vegetables and fruit! Doesn't fresh fruit have the best colours you can think of?
If I find that my bento is complete in ingredients but still needs another touch of colour, I use minicontainers or add a piece of fruit or candy as dessert to balance out the colors. But I always find that the best colours are found in nature!

Sorted by colour, you can mix and match a lot of ingredients:

Red/Orange: Bell peppers, carrots, radishes, red apples, strawberries, raspberries, cherries, cranberries... take your pick!
Yellow: Bell peppers, yellow carrots, yellow squash sorts, pickled radish, egg yellow/tamagoyaki, apples and pears...
Green: Again, bell peppers (can you see a pattern?), all kinds of leaf vegetables, cucumbers and zucchini, leeks/chives/spring onions, green grapes, green apples and pears, gooseberries...
Light: This is traditionally the domain of starch: Rice, pasta, noodles, potatoes (if you don't count them as yellow). But also egg white, white sesame seeds, parmesan or chopped leek as contrast on meaty or saucy dishes.
Dark: Traditionally you think of nori. But dark bread, any kind of meat that is prepared with a brown sauce like teriyaki, and a lot of fruit (purple grapes, blackberries, plums...) fall in that category... be creative!

There aren't many foods that are naturally blue, and because of that, the human mind will often find blue-colored food unappetizing. There are however several types of fruit and vegetable called "blue" which you will find are really purple: blue potatoes, blueberries, "blue" cabbage...


Are you interested in contributing to The Daily Tiffin? Drop us an email: blogmeeta@gmail.com. We look forward to hearing your ideas.

This Post was written by jokergirl from Were Rabbits


Raising a little foodie (we can but wish)

Monday, July 09, 2007

Posted by Amanda at Little Foodies

I'm not qualified to give advice on how to get children to eat. I don't have a degree in nutrition and I'm not a qualified chef. My only claim is that I have two children who are adventurous eaters, who on the whole seem to be very open minded to trying new things.

Lots of people comment on how well they eat and ask me what I did. I didn't do anything in particular, or special, though I can think of ten things off the top of my head that we did as a family which I think helped to give us the two little foodies that we have now.


1.From the moment they were born I had them with me in the kitchen when I was cooking. Safely out of harms way but always with a view of what I was doing. Those sensations must have been great. The sight, smell, sound, the touch – as soon as they were able I would always give them some food to handle and smell.
2.I often pierced the skin of fruit and veg to release the scent. Handing it to them and while I did sniffing, saying “Mmmm, smell this, delicious!”
3.We talk to the children - a lot! I come from a very vocal family. I'm sure it's all one and the same when it comes to food. If you have good memories of food they're normally associated with what went with the food (happy, chatty times) and not just the food itself. Unless of course it's your favourite ice cream or chocolate.
4.It's well documented that the more foods you introduce earlier on, the less picky a child will be. We thought this idea made sense and went with it, introducing various foods and flavours from early on. I know a family member who this didn't work for so it's never a dead cert it will work.
5.I'm afraid I'm quite relaxed if the children aren't in the mood for eating. This is because I know that over a week they will have had their full balance of vitamins and nutrients, etc. I'm sure food battles wouldn't help. Children instinctively pick up when we're stressed so if we're sitting there with our teeth and muscles clenched wishing that they'd just eat something. The child is probably sitting there thinking “What's wrong with her / him?” and starting to feel anxious themselves. Someone told me very early on to always look at the food over a week and never on one day. If they suddenly weren't eating well over a whole week then maybe there was something up, teething, coming down with a cold or something. I was also told that some children just don't eat very much without their being anything wrong - full stop. Only you know your child and should never feel bad about the whole food issue.
6.My older boy is nearly 6 and can eat as much as my husband (and me!). My toddler is a grazer and likes to eat little and often right through the day. I go with this for both of them. Even allowing them both to have their own way of eating, there are no separate meals made they eat what we have. The toddler tends to have it in stages though or he will have leftovers if he hasn't eaten it when we've eaten it. I'm sure there are some people who would say he needs to be eating it when we're eating it and on the whole he does but it's just what works for us.
7.Some of my friends skip meals as they'd prefer to stay slim. I don't understand this. Probably why I'm not, nor ever will be a size 0. Children need to be in a routine for eating. If you're going to skip meals don't let your kids see you do this and remember that your health is really important too, you need to be fit and strong to be there for your children. We all get busy and sometimes miss a meal but children need the routine of eating regularly to realise that they're missing a meal if they do, and not for it to become a habit where they think it's normal.
8.As soon as they were able, my children have been encouraged to cook with me. It's such a wonderful thing to do. I have lovely memories of cooking with family members when I was a child. I really want my children to be able to look back and have these memories too.
9.There is always something they can do. If you're doing something tricky and you don't want your child to help, give them something else to do and tell them it's part of what you're doing. I often hand a piece of bread to the toddler and ask him to tear it into tiny pieces. Even if you're not going to use that bread or whatever you've asked them to do, they feel included and you can always keep what they've done by for a different meal, so as not to waste it.
10.We've always talked to them about food. About the colours, the shape, the smell, where it comes from. It's only by being enthusiastic about food that children will learn to be the same.

Like I say I'm not qualified to give advice this is just an idea of what we did and it worked for us.


Are you interested in contributing to The Daily Tiffin? Drop us an email: blogmeeta@gmail.com. We look forward to hearing your ideas.

This Post was written by Amanda from Little Foodies

Staying Hydrated

Thursday, July 05, 2007

Posted by gilly

With summer in full swing in this area of the hemisphere the topic of hydration is one of vital importance. Soaring temperatures, combined with excessive sweating, and inadequate water consumption can cause serious problems. But did you know that dehydration is not simply a summer phenomenon? Any situation in which the body's delicate water equilibrium is disturbed can cause serious problems. Here are some hints on beating the heat (or the cold) and keeping you H20 levels on the mark.


  • Start your day with a glass of water - before doing anything else. A common habit is to have a coffee first thing in the morning - however, as a diuretic, coffee may put your body into a hydration deficit. (Alcohol is also a diuretic)

  • Drink liquids throughout the day, whether you are thirsty or not. Thirst is not always an adequate indicator of your level of hydration. In fact, by the time you realize you are thirsty, you are often already in the early stages of dehydration.

  • Water is best your best bet, however juice, milk, soups, herbal teas, and juicy fruits and vegetables (think watermelon, lettuce, cucumbers, apples, celery) all contribute to hydrating the body.

  • If you have a hard time consuming liquids - keep these in mind:

    • People are more apt to consuming beverages they like. If plain water is too plain, add a slice of lemon, or cucumber for extra taste. If you cannot manage with this, use some of the ideas above.

    • Many people do better to consume liquids that are cool - not ice cold. Find the temperature you enjoy most.


  • Enjoy refreshing liquids at every meal.

  • Be sure to drink lots of fluids in the time leading up to exercise - particularly in hot weather, or activities in which you may sweat a lot (skiing, swimming, etc.). Continue to drink fluids during your exercise routine.

  • If you exercise for more than 1 hour at a time, you may need to intake sports drinks or other solutions to balance both water and electrolyte loss.

  • Often times, headaches, nausea, fatigue, and infrequent urination are signs of dehydration - don't ignore these cues.

  • Be careful to balance your liquid consumption with a snack now and then. Although not as common, too much liquid in relation to salt in your system (hyponetremia) can cause serious problems (this is where ingesting electrolyte solutions such as sports drinks comes into play).

  • Have a drink before bedtime - many people lose water in sweat overnight.


I hope this helps you to stay hydrated! Until next time I wish you health, happiness and balance!


Are you interested in contributing to The Daily Tiffin? Drop us an email: blogmeeta@gmail.com. We look forward to hearing your ideas.

This Post was written by gilly from Humble Pie


Tarako spaghetti lunches

Tuesday, July 03, 2007

Posted by Biggie @ Lunch in a Box

070627b


My son's lunch consisted of tarako spaghetti (salted cod roe) with onions and aonori (cooking notes below), Latin American ham croquette and chipotle cream dipping sauce, cheese triangle, steamed zucchini (courgette) with ponzu, and a strawberry.

Mini potMorning prep time: 10 minutes. The spaghetti was leftover from the previous night's dinner, so I packed that up directly into the lunch container after dinner. I cooked two things in the morning: teamed the zucchini quickly in my microwave steamer (then tossed with my favorite ponzu sauce), and fried the frozen Goya-brand croquettes in a tiny pot. In Japan many lunch-packers have a tiny little pot for boiling or frying small amounts of food. The pot on the left is only about 4 inches in diameter (1 quart at max), so it was a good size to deep fry just three croquettes without using much cooking oil. Any small pot would work as well -- it saves on oil use and cleanup to work in miniature when frying.

Packing: I used an egg slicer to partially slice the strawberry for easy preschooler eating, packed the fried croquette in a lined food cup to absorb remaining oil, and drained the sauced zucchini on paper towels to reduce the possibility of leakage. The frozen fruit cocktail pack in my lunch kept the cream dipping sauce cool and safe inside an insulated lunch bag. Packed in the two middle tiers of a 4-tier nesting Thomas the Tank Engine box.

Cooking: Here's a tarako spaghetti recipe with good notes. My variation omits the cream, instead sauteing an onion (and maybe some bell pepper), mix in some butter, toss the pasta with tarako, mirin and a little mayonnaise, then garnish with nori and kaiware daikon sprouts if I happen to have some on hand. However you make it, it's bound to be good -- just get the sauce loose enough to lightly coat the noodles like pesto. If you can't find fresh cod roe sacs, you can use "tarama" that is often sold in refrigerated jars in Mediterranean markets.

070627a


Contents: Ham croquettes with chipotle cream dipping sauce, zucchini with ponzu, cherry tomato, and rice mixed with yellow Thai curry sauce. A small container of frozen Thai fruit cocktail (pineapple, papaya, guava and nata de coco) acts as a delicious ice pack to keep both bentos cool (see directions and cautions when freezing little containers of canned fruit).

Morning prep time: 10 minutes. In the morning I fried the frozen croquettes and microwave-steamed the zucchini. I also had leftover cold white rice and a couple tablespoons of yellow Thai curry sauce from dinner a few nights back, so I combined these in a microwave-safe dish and heated for less than a minute until the rice regained a nice texture. I now find myself saving even tiny amounts of food (like the curry) because there's usually some way it can be used to jazz up an otherwise boring bento lunch.

Packing: I packed the fried croquettes in an oil-absorbent food cup from Daiso to cut the grease, and allowed both croquette and curry rice to cool before closing the lid on the lunch. This cuts down on condensation in the box, improving packed lunch food safety and making it easier to open the box (a vacuum can form inside otherwise). The frozen fruit cocktail pack kept the cream dipping sauce cool and safe inside an insulated lunch bag. Packed in a 500ml bento box box, this plus the small fruit cocktail was just about right for an adult woman, according to the bento box size guidelines.


Are you interested in contributing to The Daily Tiffin? Drop us an email: blogmeeta@gmail.com. We look forward to hearing your ideas.

This Post was written by Biggie from Lunch in a Box.

Weights, Repetitions and Exercises

Sunday, July 01, 2007

Posted by Helene


Now that I have told you it is important to get off the couch, move around and strength train, I think it is also time to help you determine how much weight, how many repetitions and other principles of strength training. The sky is the limit when it comes to exercising our muscles. There are truly a gazillion combinations of exercises and workouts you or a trainer can create for yourself. Once again, both my camera and camera girl failed me this week so bear with me for pictures and demos. I will add more to this article next friday.

Here is one of the many ways to break down a weight routine. It requires you to work your muscles 3 days a week, with one day of rest in between. By the end of the week, you will have targeted all major muscle groups. Remember it is not what you do one day that matters but what you do during the course of a week. Always keep the big picture in mind. As the weeks go on, I will give you more routines to work with, but try this one for 2-3 weeks and see how it works for you.
Day one: chest, shoulders and back.
Day two: legs and abs
Day three: triceps, biceps

Some exercises to choose from:
- Chest: bench press, chest press machine, pushups, chest flyes
- Back: one-armed row, seated row machine, back extensions, lat pulldowns
- Shoulders: overhead press, lateral raise, front raise
- Biceps: bicep curls, hammer curls, concentration curls
- Triceps: tricep extensions, dips, kickbacks
- Quadriceps: Squats, lunges, leg extension and leg press machines
- Hamstrings: lunges, leg curl machine
- Abs: crunches, reverse crunches, oblique twists.

How do you determine how much weight to lift? Well, I hate to say that there is no scientific method to this, but more trial and error at first. The best thing to do is to set aside a few workouts just to determine how much weight is necessary. You should be lifting enough weight that you can only perform 10-12 repetitions. You should be struggling by the last rep, but still able to finish it with good form. Pick up a light weight and do a warm up set of the exercise of your choice, aiming for about 10 to 12 repetitions. For your second set, increase your weight by 5 pounds and perform your goal number of repetitions. If you can do more than that, increase the weight up again for your third set. Most of the time, you can use heavier weights with larger muscle groups such as chest, back and legs, but you will need smaller weights for the shoulders and arms.

For weight loss and general health and endurance: Perform 1-3 sets of 10-12 reps using enough weight that you can only complete the desired reps.
For muscle gain: perform3 or more sets of 6-8 reps to fatigue. Beginners should give themselves give several weeks of conditioning before going to this level, and preferably start with a trainer.

There are a few principle to respect when determining the appropriate weight and repetitions to use to maximize your goals.
1/ To be build muscle, you need to use more resistance than what you are used to. You should be lifting enough weight that you can only complete the desired number of repetitions. You should be “feeling it” within the first set and barely able to finish your last. This is going to take some trial and error at first to determine the appropriate program.
2/ As you get stronger, you need to increase the intensity regularly, as well as changing the exercises you do. It prevents hitting a plateau in your strength training goal, and it also counteracts boredom in the gym room, which is the number one factor why people stop seeing results and drop out.
3/ Specify to yourself or your trainer your exact goal: to build muscle you will have to lift heavy with more sets and less reps, and longer rest periods. To lose weight, you will have to target a variety of muscles and repetitions ranges.
4/ Rest and recovery: rest days are just as important as workout days as your muscles grow while you rest. Try not to work the same muscle group two days in a row.


Are you interested in contributing to The Daily Tiffin? Drop us an email: blogmeeta@gmail.com. We look forward to hearing your ideas.

This Post was written by Helen from Tartelette